| Home > My Projects > Home Automation > Commercial Power Bars and Outlets |
| Home > My Projects > Home Automation > Commercial Power Bars and Outlets |
I don't use a lot of commercially manufactured products primarily because these products almost always rely on the manufacturer's servers (cloud) and thus violate my "no 3rd party" rule. However, there are a range of products out there based on well known microcontrollers like the ESP8266 which an enterprising user can reprogram with custom firmware. Once freed from the manufacturers firmware, the result is a high quality (hopefully) manufactured product that truly belongs to the user.
For me, this means primarily devices based on the ESPRESSIF ESP8266 WiFi capable microcontroller. There are a wide range of products using these controllers from thousands, if not tens of thousands of manufacturers. A wide variety of these manufacturers base their devices on the tuya smart platform which is an ecosystem aimed at OEMs based around the ESP8266 and white-box products they can brand as their own. So if you buy an inexpensive WiFi smart plug, bulb or similar device, odds are it is running an ESP8266 and most likely on the tuya smart platform.
tuya smart devices have a bonus: It can be trivially easy to reprogram their firmware. Some dedicated individuals have created TUYA CONVERT which is able to exploit a bug in the tuya firmware update capability to supply your own firmware in place of the tuya firmware. Thus, many devices can be upgraded to custom firmware without even opening them up.
These devices are WiFi based, and though I try to avoid WiFi, there are times when it is appropriate. For example, a power bar or smart plug which may move around. Or a light bulb which for obvious practical reasons doesn't have an Ethernet connection. I view all WiFi devices as "temporary" so while I am testing something out, I may use WiFi but then move to Ethernet when it becomes permanent.
Geeni GNC-SW003 WiFi Power Bar |
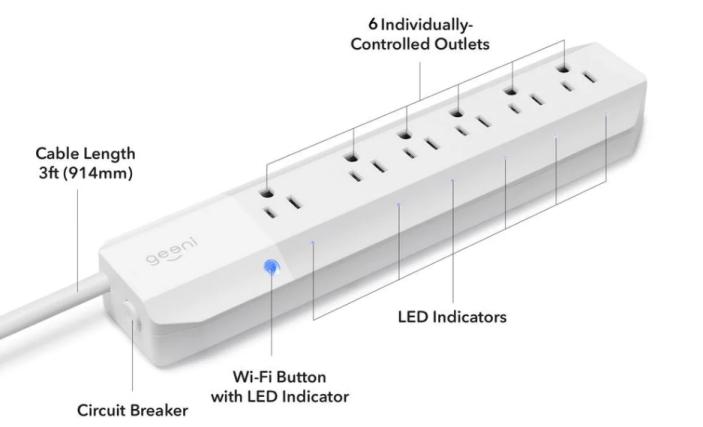
I found these power bars on sale at Canadian Tire for about $25. Figured there was a pretty good chance it was based on the ESP8266 and for the price I couldn't go wrong. Once I opened up the power bar (triangular head screws, thanks for those Geeni / Tuya) I found it contained a TYWE3S module. This is a tuya developed module which simply contains an ESP8266 with some supporting circuitry that they sell to OEMs for embedding in their products. As the pinout is easily available, I was able to use the continuity tester to trace the GPIO pins back to the base of each relay drive transistor.
| Relay | ESP8266 GPIO |
|---|---|
| Relay 1 (Leftmost) | GPIO5 |
| Relay 2 | GPIO4 |
| Relay 3 | GPIO14 |
| Relay 4 | GPIO12 |
| Relay 5 | GPIO13 |
| Relay 6 | GPIO15 |
| Button | GPIO16 |
To flash this device, I temporarily soldered some jumper wires to the TYWE3S RX, TX, GPIO0 and ground pins which I connected to a USB to serial converter I already had on a little breadboard.
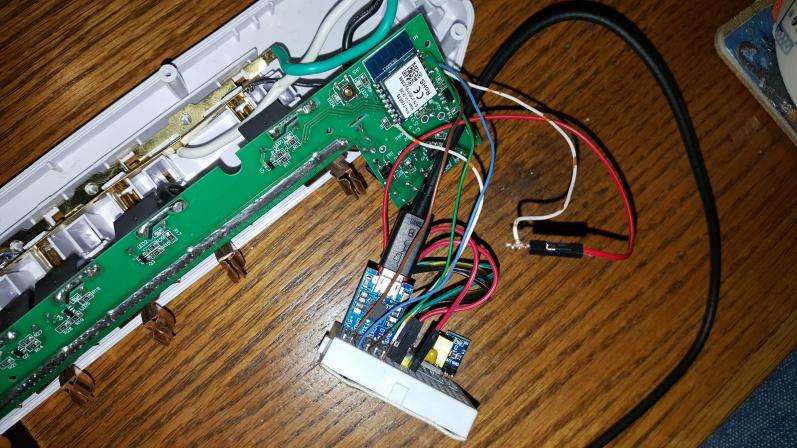
As with flashing any ESP8266, GPIO0 had to be held to ground at bootup to put the chip into flashing mode. I accomplished this with a short jumper wire. Incidentally there must be something unique about the TYWE3S because I found I had to hold GPIO to ground throughout the process.
I flashed Tasmota 6.3 which I had pre-compiled with my WiFi information. Once flashed, it was powered up and I was delighted to find it on my DHCP list. Relay 5 began clicking on and off as GPIO13 is the default LED pin in Tasmota. I then configured Tasmota for the relays and button on the appropriate GPIO pins. Once configured for my MQTT broker I could control all relays via MQTT. No reliance anymore on Geeeni/Tuya and completely local.
I now have several of these bars which I tend to purchase when on sale and use them when I need a power bar. I just configure them as POWREBAR1, POWERBAR2, etc. and have them all setup in Home Assistant as outlets so they are set up and ready to go should I need one. Because even if you just need a power bar to connect a few things up temporarily, it is extremely convenient for it to already be up and ready to go on the automation system should there be a need. Even as simple as leaving and realizing "Damn it, I forgot to turn off all the temporary construction lights!".
Globe WiFi Smart Plug #50114 |
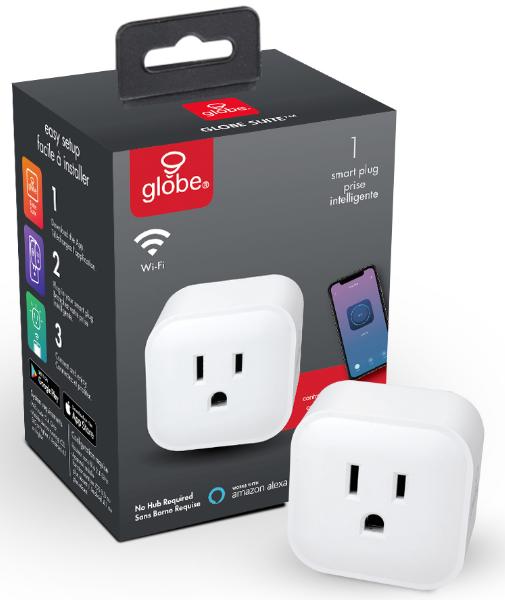
These were another on-sale purchase at Canadian Tire as they had boxes of 3 for about $20. So I picked up several with the assumption that they would be tuya smart based devices. When I brought them home I didn't even bother trying to set them up via the app and instead went straight for TUYA CONVERT. Running it on an old Toshiba Satellite Pro P300 under Ubuntu was kind of a pain in the ass, but once some conflicts and dependencies were sorted out it worked well.
Using TUYA CONVERT I re-flashed the plugs with whatever the current version of Tasmota was at the time. Tasmota was configured for WiFi, MQTT and the following GPIO settings:
| Function | ESP8266 GPIO |
|---|---|
| LED1i | D2 |
| Button 1 | D5 |
| Relay 1 | D6 |
Like the power bars, I tend to use these where I need a temporary controlled item and I have these outlets configured as "Outlet1", "Outlet2", etc. They find their use for seasonal items most often, for example controlling a solenoid valve to water a tree or managing Christmas lights.
They are also handy as buttons because in Tasmota, the button can be disconnected from the relay and set to simply sent an MQTT message when pressed. For example, for a few months I used one to control my temporary (though "temporary" in this case was about 3 years) Dewalt DXH75KT diesel burning shop heater via using the button to signal Home Assistant to turn on/off a Home Assistant Generic Thermostat which would then control the relay based on the shop temperature sensor. This resulted in far better control than the horrid built in thermostat which seemed to have a hysterisys of about 6 degrees.
SONOFFs |
No one can mention WiFi based home automation control without bringing up the ubiquitous SONOFF. SONOFF is actually an ever expanding range of automation products based on the ESP8266 that includes switches, outlets, bulbs, relay modules, sensors and more. What makes them special is that they are easy to reprogram with new firmware as most have an easily accessible internal programming header within a snap together case. In fact, the TASMOTA firmware actually began as Sonoff-MQTT-OTA which was a replacement firmware for the SONOFF Basic! It then became Sonoff-Tasmota, and finally TASMOTA which even stands for Theo-Arends-Sonoff-MQTT-OTA. As such, SONOFF products can be easily divorced from their strangely named eWeLink Smart-Home app and severed from their reliance on a 3rd party.
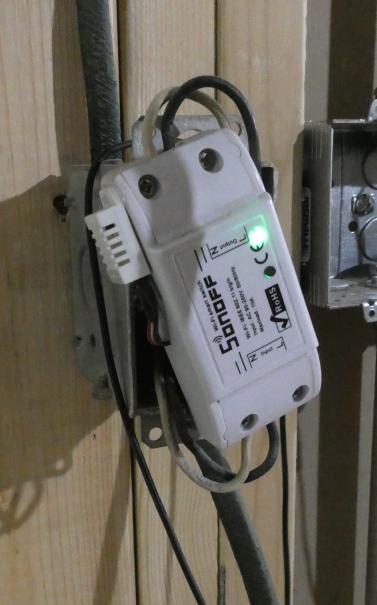
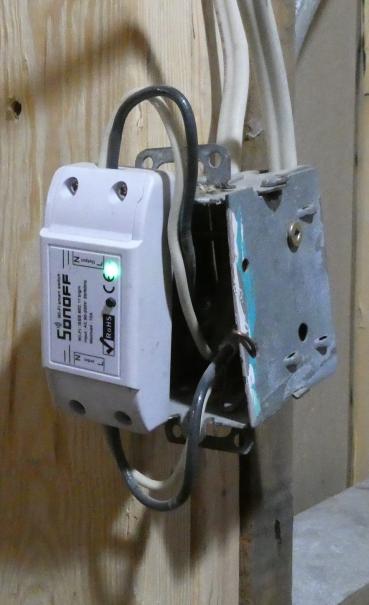
I use SONOFF BASICs, DUALs and MINIs. Because these are WiFi devices I primarily use them as temporary installation or on a non-fixed device that benefits from remote control. The title picture above for example shows a BASIC mounted to an exposed device box during renovations where it controls the overhead lights. Note also the added DHT22 sensor to provide a temperature and humidity measurement. There is a spare I/O header inside most SONOFFs which makes it easy to add additional equipment.
SONOFF MINIs not only have a local switch on the box itself but also terminals for an external switch. This makes them ideal for quick and dirty temporary retrofit while re-using existing switch hardware. If the wiring allows then they are great for augmenting a light switch, allowing automated control while still keeping the switch. This requires the neutral to pass through the box (the box cannot just contain the lead for the switch which is typically the hot lead run from the light box) to power the MINI. The MINI replaces the switch and the existing switch connected to the MINI "switch" terminals. Sometimes the MINI needs to go into the fixture box to pick up the neutral there, then the lead down to the switch (which was previously the hot lead) repurposed to the MINI "switch" terminals.
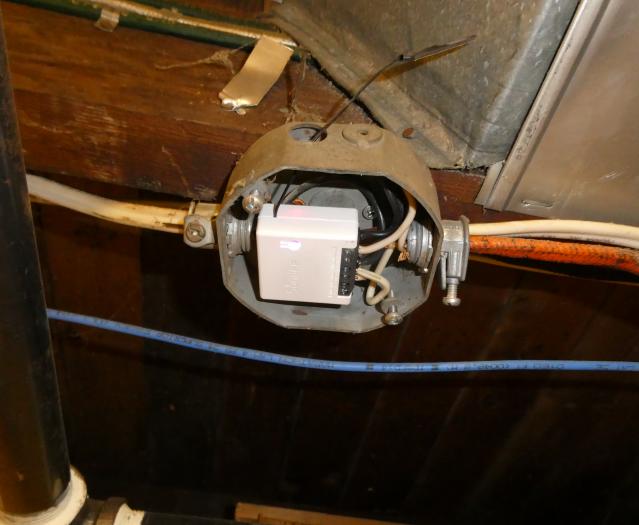
Above is a picture of a SONOFF MINI retrofitted into a light junction box. The box originally had a power feed, an outgoing line to the lights, and a separate lead for the switch. So it was ideal for retrofit. It was simply a matter of connecting the hot and neutral from the incoming power line to the MINI input terminals, the line to the lights to the output terminals, and the switch to the switch terminals (the switch had previously been in series with the hot). This one controls overhead lights in my basement which has not been rewired yet.
| Navigation | ||
|---|---|---|
|
|
Home Automation Home Assistant Hosting Hardware Protocols And Standards I/O Control DIY Power Bars and Outlets Commercial Power Bars and Outlets Sensors HVAC Voice Control Architecture and Application Automations Lessons Learned |
|