Modifications and Improvements


Home > Spudguns > Modifications and Improvements

The basic spudgun is great, but has some significant limitations. This page presents some solutions to these problems with a few simple modifications. The list is rather small right now, but it should grow with time. If you wish to contribute, then just email me with your ideas.

A Better Ignition System

I have found that the BBQ igniter, being a mechanical device, wears out rather quickly due to the large amount of use it gets-it may take several pushes to fire the gun. You will notice the igniter wearing out when it takes more then a few pushes to fire the gun, or when you must clean the spark plug after every shot, or if the gun just plain won't fire. You can solve this problem by adding a solid state high voltage generator. Take a look at the High Voltage Generator from my circuits page. Build the circuit, but substitute two TIP31's instead of the 2N3055's, and don't build the power supply section (the transformer, bridge rectifier and filter capacitor). Build a 12V battery pack by putting 10 rechargable "D" cells in series. Mount the circuit and battery pack on the gun, using a momentary switch that can handle at least 1 amp at 12V for the trigger. The transistors should be able to run for a few seconds without heatsinks before being fried, but I highly recommend installing heatsinks, even if they are small ones. Now connect the high voltage output lead of the flyback transformer to the top terminal of the spark plug, and ground the metal base of the plug. There. You now have a much better ignition system. The first time you fire the gun after installing this system, you should notice the increase in power. Be extra careful, because you have just increased the range of the gun by as much as several hundred feet. Remember to recharge the battery when the spark starts to look weak.

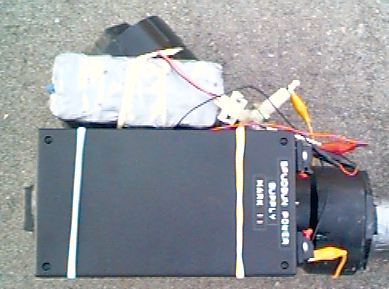
Take a look at the picture below to see the high voltage mod installed on my spudgun. The large silver box is the battery pack, while the black box contains the HV power supply.

Picture of spudgun with high voltage mod installed

Make Loading Easier

You may have noticed that after shooting the gun if becomes very hard to unscrew the cleanout plug to prepare for the next shot. Indeed, you may even need a wrench or pair of pliers to do it. This little problem can be fixed by making a handle. Go to the hardware store and pick up a short (about 8 inches) length of thin threaded rod. Also, get 4 bolts that will fit the rod, 4 lock washers and 4 regular washers. All you have to do is drill two holes the same size of the rod in one of the cleanout plugs. Put one hole on each side. Now bend the rod into a half-circle and install a bolt, lock washer and washer on each end. Thread the bolt up about half an inch. Now insert each end of the rod through each hole in the cleanout plug. All you have to do now is bolt the rod on from underneath using the remaining bolts, lock washers and washers. You now have a handle to grip when removing and installing the cleanout plug. If you wish, you can use caulking to seal around the bolt holes.

Handle mod

A Holder For Your Ramrod

Carrying around the ramrod you use to push the spud down the barrel could get annoying. This simple add on solves that problem. Get two plastic film cannisters, cut the bottom off one and wrap them with a few coats of hockey tape. Now use the hockey tape to secure one to the bottom of the barrel and the one with no bottom to the top of the barrel. When you are not using the ramrod, just slip it in the holders.

"I pushed that damn spud too far again..."

Sometimes when you ram your spud down the barrel it falls out the other end because you pushed too far. All you have to do to correct that is to install a bolt right at the bottom of the barrel. It will keep the spud from falling all the way through, and provide a resting place for some smaller objects that you enjoy seeing fly through the air.

Fuel Injection (brought to my attention by Krb Jmpr)

This simple mod uses a butane canister to easily refill the gun between shots. It originally came from the Anarchist's Cookbook. The butane canister is the kind that you use to refill lighters. You know, the tip of the canister is inserted into the the refilling orifice of the lighter. 

If you look closely at the refilling tip, you will notice that there is a plastic lip about a centimeter and a half from the business end of the tip, this lip is what is very important.  Do not damage it while converting for Starch Abuser ( I like that by the way ).

Now, you need something that will fit over the tip, but will still catch on the lip, so that when you press down on the something, butane gas is let out in a controlled fashion.  More or less.

What I have used are your everyday coins that have a hole drilled in the center of them.  I would recommend a size, but the o.d. of the tip varies from manufacturer to manufacturer. 

Once you have your " actuator " attached, all you need to do is to channel the resulting butane gas into the combustion chamber.  I have set mine up so that a rubber hose ( whose i.d. varies according to the tip) just fits over the top part of the tip on the canister.  It will need to fit tight, you would not want it to fly off and waste your propellant.  Use epoxy if necessary.

The other end of the rubber hose is attached to metal tubing, or straight to the control valve.  This is important, since the lack of a flow control/ shutoff valve will allow combustion temperatures and pressures to be applied to the rubber hose, and also to the butane canister.  Do not leave out the valve!!  Reason for the metal tubing from the valve to combustion chamber?  To prevent blow out of rubber hose form combustion temperatures in middle of potato fight. 

The metal tubing from the combustion chamber needs to be terminated at both ends with compression fittings.  This is simple.  One fitting, will attach the tubing to the valve, while the other needs to be securely fastened to the combustion chamber in one way or another.  I used a compression fitting that had the female side attached to the combustion chamber via way of a large ball of epoxy.  It works.

Now to use the autorefiller, just load barrel, turn on gas ( press coin or whatever ), open valve, let chamber fill, and shutoff valve, and then gas.  Now you are ready to go.  Hit the ignitor, and away she goes

Cheaper Ignition (Andy Baucke)

Instead of using a spark plug just buy a Coleman lantern lighter. It's cheaper and easier.

Chamber Changes, Ignition Inquiries and Fuel Facts (Bryan E. Smith)

Combustion Chamber Changes...

Having been into auto racing since I was quite young, I have been applying some of the things I have learned to spudding. Everyone who has been around high performance cars know the Mopars Hemi (short for hemispherical head) engine was one of the most powerful production engines of that era. This power was contributed significantly by the design of the combustion chamber. I'm willing to bet the most spud guns are only getting 50 to 60 percent combustion in the designs I have seen.

Just because it goes off doesn't mean it burn all available fuel. So I though went into the books to find out what Dodge had done in it's Hemi to combat this problem. I found that by rounding the back of the combustion chamber and placing the ignition device dead center in the back of the chamber, it ignites a flame front equally in all directions and provides a better surface and more surface area to reflect the pressure wave and flame front forward into the front of the chamber and into the barrel. The flame front will continue down the barrel providing spud acceleration until the potato actually leaves the barrel. While this happens on many spud guns (evident by a flame emerging from the barrel instead of just smoke), the rounded chamber end tends to push the unburnt fuel and air into the barrel instead of slow burning under oxidized fuel from a poor combustion. This further adds to the pressure wave. I haven't measured to PSI differences but using as close to the same charges as I can, I notice bigger brighter flames coming from the barrels end than the standard combustion chamber on a gun that is otherwise the same. I haven't yet measured spud distance but I can tell a definite increase in the height when shot at the a thirty degree angle to the ground that I use as a testing standard.

Ignition Inquiries...

As with cars, a good ignition of the fuel/air mixture is required for good spud projection. Using BBQ grill ignitors and lantern ignitors might work but they don't work well. They use a pezio electric disk which produces a quick, snappy, cold spark. This doesn't ignite the mixture well and much is just blown out into the atmosphere. It doesn't take a great deal of pressure to get a spud moving down the barrel. So you want as much pressure as you can build as quickly as possible. The problem lies in the fact that the amount of pressure you can build is inversely proportional to the amount of time you have to build it. The more pressure you build, the faster the spud moves out of the barrel. The fast the spud exits the barrel, the less time you have to build pressure. You your fuel/air mixture to ignite as fast and completely as physics will allow. So among other things, you need the best ignition system you can get. The auto industry has spent millions of dollars researching the best way to ignite an fuel/air charge. I use am currently using an DIS (Direct Ignition System) off an Oldsmobile to fire my gun. The DIS coils produce nearly 100,000 volts at close to an amp when fired with a pulse capacitor. This produces a hot, fat, long lasting spark. The grill and lantern ignitors produce an output of maybe 1,000 or 1,500 volts in the micro amp range (.0001). You can see the difference. Grill and lantern ignitor are designed to be small and easy to fit on a lantern or in a grill. They are designed to just ignite the fuel/air mixture, not produce a rapid powerful combustion. They draw back to using a DIS system is that they are large and heavy. You couldn't use one on a hand gun. But they are great for a tripod mounted system. They most important draw back I must mention here is that they are deadly and will kill you without a second chance. I have heard of mechanics losing fingers to these devices (These are the lucky ones that got hit by just a spark that jumped to one of their extremities. Direct contact with one of the high current wires causes your life flash to before your eyes.). There are safer alternatives which still provide a satisfactory ignition system. You can use are regular points type ignition coil with a buzzer from Radio Shack instead of the DIS coils and capacitors.

Fuel Facts...

I have much talked about the relationship between spud gun and auto engines. Fuels are no different with one exception; octane ratings. The lower an octane rating a fuel the quicker it combusts. While I have been talking about rapid combustion, there is a draw back to low octane fuels. Burning fuels create hot expanding gases that push the beloved spud out of the barrel. A low octane fuel combusts very quickly and does not produce as much heat and therefore less pressure. For the same reason 93 octane gas produces more horsepower in your car, it sends your spuds farther down range. The exception I mentioned before is that in an auto engine, too high an octane will destroy it. There are thousands of detonations a minute at idle in a car. High octane fuel produces more heat than a lesser octane so you can burn up your engine with high octane. Also, at high RPMs extremely high octane fuel will continue to burn when the piston is returning to the top of the cylinder. This is why you see fire coming from the pipes of top fuel dragsters. A side note I must include is that, by these standards, 93 octane pump gas is not really a high octane. Since the spud does not return down the barrel, we don't have to worry about it. Also since even the fastest spud loaders only fire once every minute or so, heat is not as big of concern. You should make sure you gun is not over heating though. Nitromethane is about the most potent fuel you can get short of actually using gun powder. Even more powerful if you get the fuel/air mixture right. I used nitromethane and NO2 (nitrous oxide) in my latest experimental shots. I don't know what happened to the spud but it blew the spark plug and a section of the end cap out of the back.

Combustion Chamber Construction (oh my goodness)

Well, one small improvement would be to not use the Y pipe. Instead use one 4" pipe as the chamber and connect the firing device to the rear of the pipe. This allows the shock wave of combustion to go straighter to the potato.. At the end of the 4" pipe, about a 1' long, the end will unscrew, allowing easier cleaning to be made.

Spud Trimmer Improvements (Michele Michaels)

Sharpen the inside of the barrel about 1/16 of an inch. This cuts the potato a little bit larger than the barrel and provides a much better seal. This little improvement, if done right, will add on at least 100 yards to your gun's range.

You Can Never Be Too Careful... (Sean)

Drill a hole in the bottom of the cap and super glue a piece of plastic over it. Do not use a lot of glue. Seal it with caulk. The purpose of this is if the pressure becomes too great in the chamber, the cover on the cap will blow off preventing a chamber explosion.

Easy Load (Liam-Ed O'Connor)

You can make loading easier by applying the following modification. You will need: 1)2' piece of pipe the same type and thickness as your barrel, 2)T fitting of the same type and thickness as your barrel, 3)Stick or rod and 4)Polystyrene. The illustrations below show you how to apply the modification.


Noisy Cricket Improvement (MrPink9970@aol.com)

On the Noisy Cricket from back side of the T you could use a reducer to have a bigger chamber. Instead of using a grill sparker thing you could use a tip lighter and glue it in the back, then you could use the bottom of the T as a handle and have a trigger in the back.

Nitrous Oxide (Dave Mason)

A cheap way to make a nitrous gun is to get a whip cream dispenser from a restaurant supply place and Whippet cartridges. Strap it to the gun with pipe clamps, put a air hose on it and connect it to a valve on your potato gun. The Whippets cost between 8 to 10 dollars a box and you get a 5 to six shots per cartridge. This is pure N2O like the stuff in the dentist office.

LASER Sight (jackson)

Get a cheap laser pointer and secure it to the side of your barrel somewhere in reach of your non-firing hand. In the evening or at night when the laser is most visible it will provide an accurate sight for up to 3/4 of you spudgun's range.

Easy Refueling (Tim Mosbrucker)

To put fuel in my spud gun I got an old refillable butane lighter and took the refiller piece out of the lighter. I then installed it into my gun. When I put fuel into it I just attach a butane refiller nozzle to my starter fluid an shoot it in.

Cheap Ignition (anonymous)

I have an idea for your ignition system. It is cheaper than any other thing I've seen. Just buy one of those cheap red lighters that have the trigger (for BBQs). Drill a hole in the side of your combustion chamber and just stick it in and pull the trigger. If it doesn't flame any more dont worry, if it sparks it will work very efficently. Note that this can be dangerous and could reduce the efficiency of your gun (big hole in the chamber).

Some Assorted Ideas (Bruce North)

Instead of a Y section for the combustion chamber use 3" or 4" pipe with a threaded clean out valve. Dont put fuel in the chamber though, you will loose to much because of the wide opening. Instead get a 1/2" tap and put some threads in the middle of your chamber and screw in a copper pipe valve. You can save a lot of fuel this way, especially whe using propane. It makes a tighter seal around the torch nozzle.

Pressurizing The Chamber (Martin)

What you do is tick the potato in about 4 inches down the barrel. Then spray in your propellant and cap it up. After that, push the potato down all the way. This compresses the gas and air giving you better pressure, combustion and therefore distance.

Shorten That Huge Gun (Tim Stowe)

Here's a simple thing to decrease the overall length of the big gun quite a bit: Get yourself two 90 degree elbows that are the same diameter as your barrel. Get a short length of pipe the same diameter as your barrel. Glue the two elbows onto the short section of pipe so that both openings point in the same direction. Glue your combustion chamber onto one side and your barrel onto the other. This gives you the same barrel length, but now the combustion chamber sits under the barrel instead of behind it. Greatly increases portability without decreasing range.

Ammo Holder (Anonymous)

Take a wood plank and put nails through it, duct tape or glue to the side of barrel and ramrod holder pipe. Now you have acess to 10 extra taters right on the side of your gun were you need them!

Back to Spudgun Page | Mail Me | Search