| Home > RX-7 > Tech/Mods > Modifications > How To Add Daytime Running Lights |
| Home > RX-7 > Tech/Mods > Modifications > How To Add Daytime Running Lights |
Most cars sold after the late '80's are equipped with daytime running lights. This means that the low beam headlights are kept on all the time. This makes your car much more visible to oncoming traffic and thus reduces the risk of a head on collision.
Obviously, for most cars with flip up headlights, this system won't work. There is no way to light the headlights without putting them up. However, the RX-7 has those useless flash to pass lenses. In Japan, these lenses contain another light which functions as a daytime running light. Such Japan spec lights are available from Rotary Performance for around $165 each. This price is a little excessive, considering that you can add this feature for under $10. The key is that on the RX-7, the headlights can be lit without lifting them, and will shine through the previously useless flash to pass lenses. This modification will probably take no more then 1 hour.

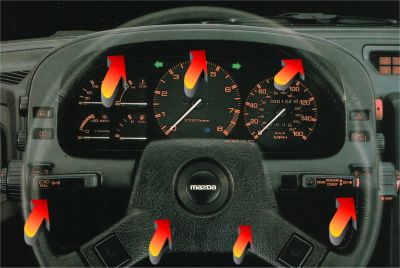
Pay attention when removing the bottom screws. You want to take out the large ones, not the small ones. With all the screws out, you should be able to slide the bezel out about 2.5 inches. This should expose the back of the switches and the associated wiring harness.
When grounded, this wire will turn on the headlights but will not raise them.
Method 1: Connect the wire through a switch. The switch can be mounted in the dash or any other suitable connection. One end of the switch would be connected to your wire, the other end connected to ground. This will give you manual control over the lights.
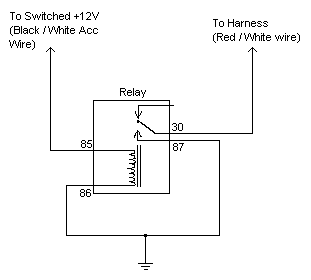
Method 2: Connect the wire though a relay. The wire will be connected to ground, with a relay in series with that connection. The relay can then be activated by a +12V signal. That signal can come from the accessory line, or ignition line. This provides automatic control of the lights. One side of the relay coil is connected to ground, the other end is connected to your switches +12V source. If you would like to use the ignition or accessory wire, you will find the black wire with the white stripe on the steering column harness very convenient. This will light the lights when the car is running or the ignition key is in the "run" position. You can, of course, connect a switch in series with this connection to retain manual turn-off capability of the lights. The schematic below should help you:

1. Don't mess around with your headlight switch wiring unless you know exactly what you are doing. If you do, you will most likely fry your headlight switch, turn signal lever, or both.
2. If you use the accessory wire to activate your relay, your headlights will be on anytime the switch is in accessory position. You may want to include a switch to turn them off to avoid battery drain.
Back To Mods Page | Mail Me | Search | ![]()