| Home > My Projects > In-Car MP3 Player |
| Home > My Projects > In-Car MP3 Player |
Date Of Project: Winter 1999
Soon after I got my RX-7 I felt the need to upgrade the god-awful stock stereo. The choices were basically to replace it with a CD player, replace it with a CD changer or replace it with a tape deck with an aux input. I chose the latter as I had many more tapes then CDs. The aux input was required specifically so I had another option to get music into the system. Once again, there were several choices: 1. add a CD player, 2. add a CD changer, 3. do something different. Naturally, I chose the third option.
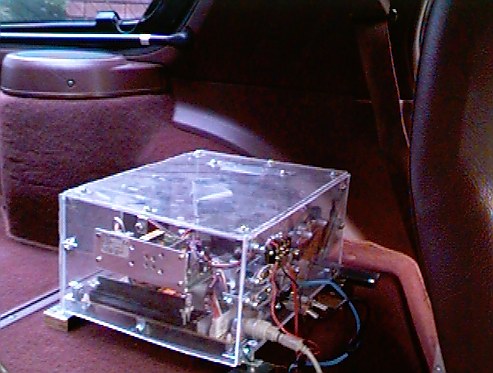
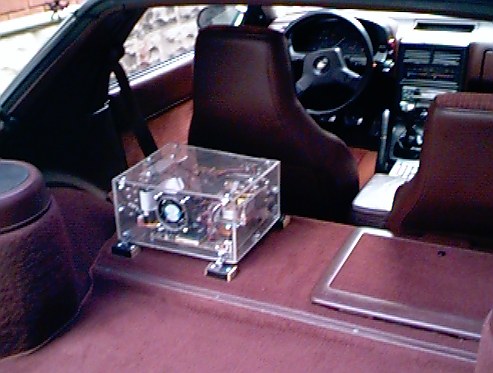
The "something different" would come in the form of an in car MP3 player. Not one of those wimpy commercial players that hold 70 minutes worth, or a CD based MP3 player that still requires changing discs, but a custom 10.2 Gig 200MHz home made player. This is pictured below.
Update: As Of Spring 2006, The Player Is No Longer In use
I had the player in the house for some playlist and software updates. As it was sitting on the basement floor receiving these updates, a certain someone accidentally bumped a monitor off a table, which landed directly on top of the player. The top of the case shattered which was an easy repair, but the hard drive took most of the damage. A scandisk revealed hundreds of thousands of bad sectors scattered across the drive and took two days to mark them bad and move data around where possible. The player limped along for another 6 months or so with a failing drive until one day, on the way home from Toronto, the drive crashed. I decided at that point to retire the home made player in favor of a commercially made head unit with a USB input. So I purchased several JVC KD-BT1 CD/AM/FM/USB/Bluetooth units and installed one in each of my vehicles. With products like this out and the proliferation of cheap MP3 players, I think the era of the MP3 playing car PC is probably over.
| Motherboard | PCChips M571LMR w/onboard Sound, Video, LAN, Modem |
| Processor | Cyrix 6x86 200MHz |
| Memory | 32MB PC100 |
| Hard Drive | Quantum Fireball 10.2 Gig 5400 RPM |
| Power Supply | Arise Computer 865V |
| Control | Relabeled numeric keypad w/voice feedback |
| I/O | 10/100 EtherNet running TCP/IP |
| Case | Custom Lexan |
As of 2001, some of the hardware has changed for various reasons. These changes are noted below.
As you can see, the hardware is mostly made up of standard components. The only difference is the power supply and the case. The major problem with running any type of computer in a car is getting the voltages necessary. A lot of people use an inverter to bring the car's 12VDC to 120V or 220V to run a standard PC power supply. To me, this seems like a ridiculous hack as all you are doing is converting 12V to 120V or 220V and then bringing it back down to 12V and 5V with the PCs supply. This is inefficient and often introduces noise into the system. The solution is to use a DC-DC converter such as the Arise unit. This power supply is specifically designed to run on 8V-16V, and since it is industrial, it is designed to operate in extreme conditions. Arise Computer sells them through mail order for about $80 US, so the cost is not prohibitively high. The case was my own design. To make it easy, a standard computer case would have worked, but would have lacked aesthetic appeal and just looked out of place. I chose instead to build a custom case out of clear Lexan. In this way, I could tailor it exactly to the components being used. The case was actually the most complicated part of the project, taking almost a month to build.
As you may be able to see, the hard drive is mounted vertically. This is much less compact then the horizontal position, but allows a measure of shock protection. Mounting the drive vertically prevents the heads from slapping into the platters when the drive is jarred, something that is bound to happen in a car. Instead, the heads just harmlessly flap up and down. When the heads stop moving, the drive continues standard operation. The whole player is also mounted on small shocks, made from a spring wrapped around a screw. So far these have been effective in preventing any hard drive damage. However, in the summer of 2000 I had a hard drive failure. After analysis of the drive, it was determined that it failed because of an electrical defect, not surface damage. Quantum confirmed this when they replaced it under warranty.
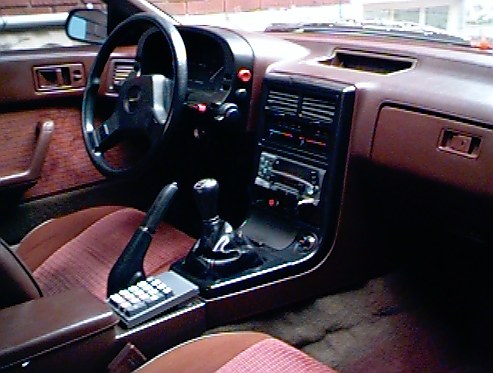
The numeric keypad is the type that some laptop users may use. It connects to the standard PS/2 keyboard port, and provides all the numbers, plus the mathematics signs, num lock and an ENTER key. The feedback will be discussed in the Software section.
Because this motherboard is an "all in one" unit, video, sound and LAN are included on the board. The video is a standard SIS chip with 4MB of shared RAM. The sound is a standard 16 Bit Sound Blaster Compatible chipset that actually sounds pretty good. Sound quality is of course a high priority in a system like this. The LAN is a 10/100 generic chipset that tends to cause a lot of collisions when in use. It runs TCP/IP with a fixed IP address. In case you are wondering, the LAN jack is mounted right above the gas filler hole.
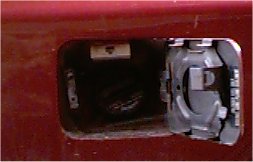
The player is connected to the AUX input on the car's stereo, with a long shielded patch cable running under the center console. Power for the player is provided by a switch on the dash, mounted below the stereo in a mirror black panel. This panel also contains a large red reset (panic) button and the switches for the other accessories in the car. The player can be turned on and off regardless of whether the engine is running. This allows me to leave it running if I am only going to be away from the car for a few minutes. Because the player takes a minute to boot, this is very convenient.
Due to a major accident (I was rear ended, it was not my fault. See accidents for details) most of the hardware in the player has been replaced. The original motherboard cracked in the impact, and was replaced with an Amptron 586LMR. This motherboard is basically the same as the PCChips motherboard that was originally installed in the player. Unfortunately, the new board was found to be incompatible with the Cyrix processor, so an Intel 166MMX processor was installed. Not long after the motherboard was replaced, the hard drive also failed. It was replaced with a 10.2Gig Fujitsu laptop drive. Roughly a week after that, the Arise DC-DC converter was replaced as the 5V output became very unstable. Even though all these problems were caused by the collision, they were not covered under insurance for various reasons.
The hard drive is partitioned into two partitions. A 300MB boot partition houses Windows and the player software, and the rest of the drive holds the MP3s. The boot partition is FAT16 while the MP3 partition is FAT32 to support the large disk size. Both partitions are shared on the network so that data may easily be transferred.
The operating system of the player is the Windows 95 kernel. Windows 95 was chosen for it's multitasking ability, as well as the fact that it supports large hard drives, long filenames and native networking. It can also be programmed in Visual Basic, using standard APIs. The OS was stripped down to the bear minimum, with only the network components, Internet Explorer (required by Windows Media Player), Media Player and the Microsoft Speech controls included.
MP3 playing is taken care of by a custom piece of software I wrote, and creatively titled "Car MP3 Player, Version 1. It was written in Visual Basic and is more like the "glue" that holds several ActiveX objects together. The actual playing is done by Windows Media Player, which is controlled through it's ActiveX interface. As mentioned, the Microsoft Speech SDK was used to provide voice feedback for all commands, much like a voice mail system. This was done to eliminate the need to an LCD screen which both lowers cost and improves safety in an automotive environment. Plus, it is just plain cool to hear this thing talk.
In any type of MP3 player, playlists are needed to organize and catalog files. Originally my player made use of standard text files as playlists. These were simply text files containing the file names of the song in "Artist - Song.MP3" format. Playlists could of course include or exclude anything on the player, and could be set up for any mood or situation (ie. playlists called "Road Rage", "Cruisin' Tunes", "Hard Core Hill Billy Rap", etc.). This worked fine for a year, but I wanted more. The shortcomings of text files were obvious. For example, if a song was added to the play it must be manually added to all applicable playlists, in the right order. Same thing if a name was changed. This was unacceptable. In early January of 2001, the player was rewritten to use a proper database. Now, instead of text files, there is a single Access database that contains every file and the information that goes with it (Artist, Year, Album, SongName, etc.). Playlists also became SQL statements. That way, as long as the information is entered correctly for each file added, playlists are always up to date. For example, the playlist "All '80's" may contain the statement "SELECT FileName FROM Songs WHERE Year > 1980 AND Year < 1990". This pulls all songs written between 1980 and 1989 from the database. You can see how powerful something like this is. For albums, a statement may look like "SELECT Filename FROM Songs WHERE Album="Phantom Of The Opera" ORDER BY Track". This pulls all songs from the Phantom Of The Opera, in order of Track. These statements can be written by hand if you know the language, or Access can be used to visually design the query.
The software also takes charge of the keypad, responding to inputs that no standard Windows application would recognize. Since the keypad is relabeled, the actual keys behind the functions are hidden. For example, "Play/Pause" is "-", so when that key is pressed the application knows to play or pause, depending on it's current state. All standard keys are there, plus a key to shut down Windows, turn random play on and off, set the announce mode (speak everything, speak song selection functions only, speak nothing), mute, up/down, enter, song select and playlist select. Controlling the player is rather easy once you get the keys memorized and get used to the voice based interface. Speaking of the voice, any voice pattern can be used. This ranges from Homer Simpson to "Sexy Telephone Operator", which it is currently set at. She's not particularly sexy, though.
In November of 2001 I rewrote the MP3 player software. It is now titled "MP3 Player Version 2" and uses a relational Access database to allow browsing by Artist, Album, Genre, Playlist and Song. The new software also includes true random capability (random play will not repeat songs until all have been played) and resume (songs resume where left off if the player was shutdown while playing).
For the most part, assembly went slow and steady. There were no major problems, although the first motherboard I got was defective. Unfortunately, this was not discovered until I had installed the player in the car. Let's just say that it was a frustrating experience. After waiting a week for the new motherboard it was replaced on warranty.
The case was assembled first. Lexan is a hard material to work with. It is tricky to drill and cut without cracking, and easily scratched. Because of this, it took 3 weeks to put the case together. The sides were joined with small angle irons just like you would use in a wood or metal cabinet. This gave a very nice industrial look. For anyone considering building a Lexan or PlexiGlass case, the result is well worth the assembly hassles.
Once the case was near done, the motherboard, power supply, hard drive and connectors were installed. The lid was then bolted on, and the main cooling fan fitted to close up the case.
Because I had no easy way to load the software once the case was together, it was loaded first with the components put together temporarily on the floor (where all my work gets done). Once the case was on, it was literally plug and play.
Assembly pictures are below.
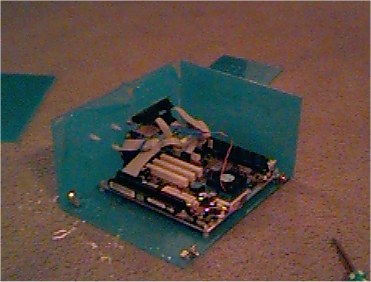 | The case half assembled with the motherboard mounted. The blue stuff is the protective film the Lexan comes packed in. |
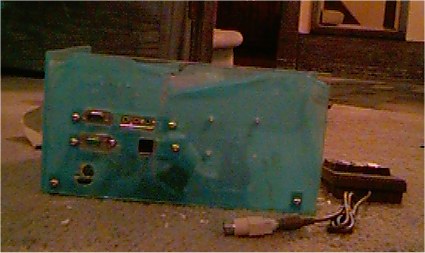 | The case with the I/O connectors installed. |
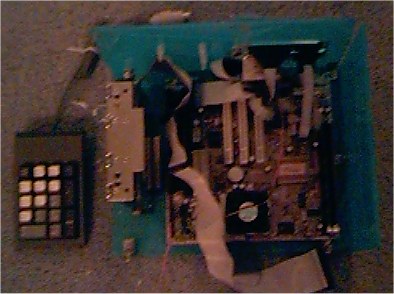 | The case with the HD installed vertically. |
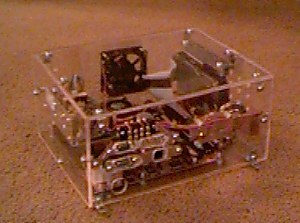 | The finished Player. |
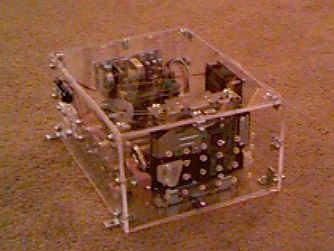 | Another view of the finished player. |
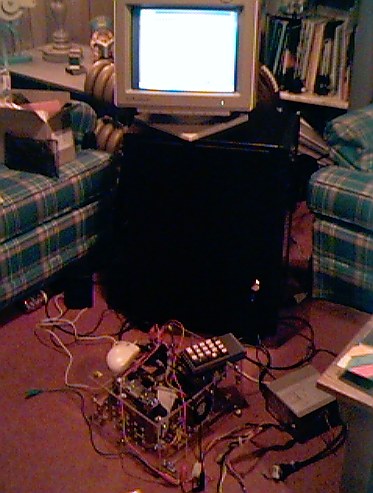 | Testing the player with a monitor, mouse and keypad. +12V power was supplied with a standard PC power supply. |
Installation into the car was nothing special. It was done on a cold Saturday afternoon. Holes were drilled in the deck behind the drivers seat and wooden blocks were mounted. The player was then screwed into the wooden blocks. The screws were left loose, and springs were inserted between the mounting angle irons and the blocks. This forms a simple shock absorber at each corner.
The keypad was mounted behind the shifter. This provides a convenient location to reach, and prevents the driver (me) from being distracted finding a keypad. By mounting the keypad there, I lost the use of the small coin holder that base model RX-7s come equipped with. No big deal, since it is quite useless anyway.
So far, peoples reactions have been widely varied. Some are intensely interested, some don't care. By far the most interesting I get is the hassle when I try to cross borders get stopped by the police. Everyone wants to know what it is, what it does and if it is dangerous. Since I work at a computer store, most customers have found it very cool and want to know all the details. Passengers prefer the constant music of the player to the start/stop style of the radio.
I could put together a huge list of links, but why do work that is already done? You can find all the links and information you need at WWW.MP3CAR.COM. Along with a main links section, there is an excellent discussion board which I frequent. This site is the single greatest resource for any automotive computing subjects.
Please read the following FAQ before emailing me about this project. It may answer your question. The FAQ is updated based on common questions I receive via email.