| Home > My Projects > My TV |
| Home > My Projects > My TV |
Ever since I began playing around with antique radios, I have wondered what it would be like to restore and use an antique television. So, when I found this in an antique store, I just had to buy it. I picked it up for a very reasonable $75, and began restoring it.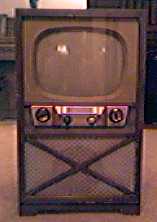
When I got it home, I first looked on the 'Net for an answer to two questions. The sci.electronics.repair was a great help and gave me the answers: 1) No, old TVs do not use resistive line cords, 2) If I'm not careful I'll electrocute myself. The second one I already knew, but the first was very helpful. I then plugged it in. Now, for those of you who don't know, this is almost the worst thing you can do to an antique radio or TV. The reason is that if there is another problem (such as a shorted transformer), you could destroy some very hard to find parts. What you are supposed to do is increase the voltage slowly and carefully look for any signs of trouble. Anyway, luckily there were no major problems with my set.
The first thing I noticed after the 24 tubes had warmed up was a rather distorted picture and annoying hum. That was a definite sign of a dead filter capacitor. At the moment, that looked like the only problem with the electronics. The wooden case was another matter. It appeared that it had suffered a great deal of abuse in it's day. The top was covered with scratches and some sort of sticky substance (which I still haven't identified). The sides were in about the same condition. Surprisingly, there were no problems with the front and control panel, aside from a few scratches and a lot of dirt.
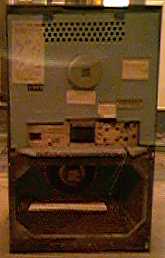 I decided to fix the electronics first. That way, if for some reason it cannot be fixed, I would not have wasted the time restoring the wood. I figured that now would be a good time to move it out of the living room (to the delight of my family) and into the basement where I could start work. Now, this thing is an old TV. The chassis has a transformer that would make your hair stand on end (it was bigger than a micro wave transformer). The chassis was solid copper. The picture tube was about an inch thick all the way around, except for the neck of course. In other words, it was heavy. I would guess about 200 pounds, but it could very well be more. Anyway, to make a long story short, we got it downstairs in about half an hour and I started actual work a day later.
The first thing was to pull out the chassis and get everything cleaned up. That was really no big deal, it just took three people to do. After it was cleaned, I discovered not one, but 4 filter capacitors, and most of them were multi sectional. To make matters worse, they were all around 450V and had some pretty strange values. Probably custom made for that TV. It was very obvious that I would find nothing like that these days. The solution to this problem is very easy though; just make up the multi sectional capacitors using several modern capacitors and tying the ground leads together. Once I had bought all the capacitors (which left my wallet feeling very light), it was simply a matter of replacing the old units with the new. I replaced them one by one, just so I could see the effect. It was actually quite dramatic. The picture improved a great deal even when I just replaced one unit. When all were replaced, they fixed the touchy vertical hold, the hum from the speaker and the picture distortion.
With the major problems out of the way, I could focus on the little things. For one, the tuning was kind of fuzzy. It was determined that was caused by the contacts on the old two tube tuner. They were filthy. Cleaning them fixed the problem. Another was that the picture was sort of slanted to the right, and no amount of adjusting could fix it. So, I just rotated the deflection yoke a few degrees. Problem fixed.
After the electronics were finished, I began working on the box. It is a veneer over a plywood casing. Since the existing finish was so badly damaged, I decided to refinish it. I stripped off the majority of the old finish using a standard stripper and a plastic dry wall knife. After most of the finish was removed, I went over it about 8 times with steel wool soaked in stripper. This removed the stain, and took anything I missed out of the corners. It also served to take off any scratches that were only skin deep. What I ended up with was about as close to new, unfinished wood as you are ever going to get.
The only real problem happened just after I began stripping the case. I don't know what caused it in the first place, but once it was tracked down it was easy to fix. I noticed it when I fired up the chassis one night. No sooner had the tubes warmed up then a loud arcing was heard. Of course, at that moment I pulled the plug from the wall. At first, I thought the flyback had died, but then I remembered that it was a crackle, not a sizzle. Therefore, it had to be after the HV rectifier tube. An inspection of the HV lead found nothing, as did an inspection of the tube socket. All the wiring under the chassis was fine, and so was the anode connection of the picture tube. So, I fired it up again. As soon as I heard the arcing, I began sniffing for ozone. I soon got a huge whiff of it from the top connection on the damper tube. Sure enough, the cable there had come loose and was a little burnt. I resoldered the cable and the set worked fine once again.
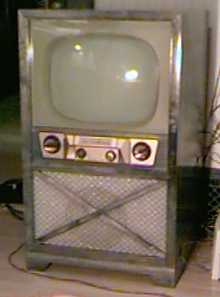
The case is actually made of two parts. Most of it is a mahogany veneer, but the front trim is solid oak. This required the use of two different stains. I used a fairly dark walnut for the oak trim. For the rest of it, I used a red mahogany. After staining, I applied a spit coat of lacquer, then three more regular coats. 000 steel wool was used between coats. The dials and control console on the front were also removed and cleaned. The dials got a light coat of lacquer for a nice shine.
 Since all the electronics were finished, and the case was also finished, all that was needed was to put the thing back together. I decided to wait on that until the unit was in my bedroom. That way, I could carry a 100 pound chassis and 100 pound case/speaker/etc. up the stairs a lot easier then a 200 pound TV. Once things were moved into my room, and the final assembly was completed, the project was basically done.
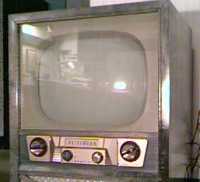
I now have one Model 47M35X Admiral 17 all tube TV sitting beside my dresser. I am not one to restore something and just display it. I use it almost every day for about 1 to 2 hours while I do my homework. I expect it to work every time I turn it on for many more years. In fact, before I worked on it, the last time it was serviced was 1955. This was indicated by a small tag on the flyback from the shop. I haven't tried to contact the shop yet (to find out who the original owner is/was), but I plan to do that very soon. By the way, you might be interested to learn that "Run: 1" was stamped on the chassis. I guess that this means that it was one of the first units of that model to be produced.