Aluminum Bicycle Cart
Date Of Project: August 2010
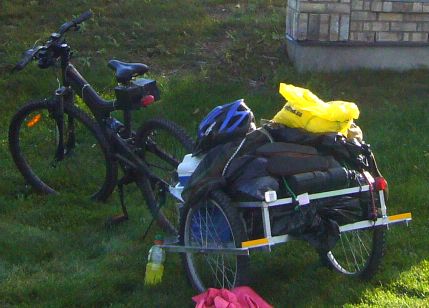 Late summer of 2010, two friends and I decided to bicycle the roughly 45 KM journey from London to just outside of Port Stanley, Ontario. We had the use of a cabin for the weekend. And by "cabin", I really mean "shack in the woods". And by "shack in the woods", I really mean a rudimentary structure consisting of 4 walls and a roof, with the only modern convenience being a wood burning stove equipped with a 12 volt fan that probably hasn't worked in 30 years. What this meant was that besides a simple change of clothes for an overnight stay and some food, we had to also bring water, sleeping bags, and basically everything else needed to eat and sleep. It was, in essence, a camping trip.
This created somewhat of a small dilemma. While a sleeping bag and a few articles of clothing will easily fit in a backpack, enough fluids and food for three people over two days, plus incidentals like a bicycle repair kit and the garbage we will generate, will not. Remember, it's not just the drinks and food, it is also the ice necessary to keep it fresh. Plus, of course, a bottle of champaign to toast our arrival, and enough beer for later!
For quite a while I've wanted to make a small bike cart and since I was between projects at the time, it was the perfect opportunity. While bike carts are commonly available at any bicycle shop, the cheapest I could find was about $350. Certainly with a set of small bike wheels, some aluminum and a few hours in my shop I could come up with something? It's not as if a bike cart is anything more complicated than a simple frame with a wheel on each side.
The first thing I did was check my shed for a set of usable bike wheels. Unfortunately, all I had were two rims of unmatching sizes in questionable condition. They went into the scrap metal bin, and I then drove over to the local bike shop. I left with two 18" wheels, inner tubes and tires. And $80 less in my wallet, as well as the reminder how expensive it is to purchase bicycle wheels brand new. A short trip across the city to the metal store and I picked up about 20 feet of 1" x 1/8" aluminum angle.
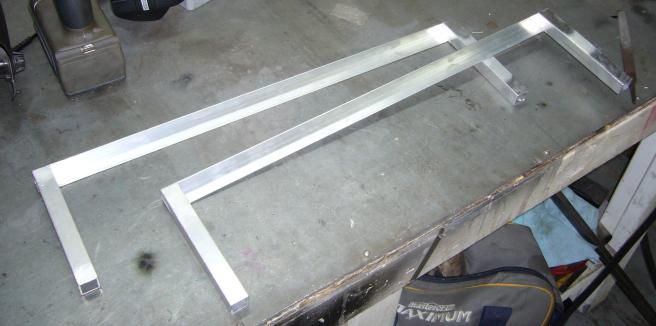
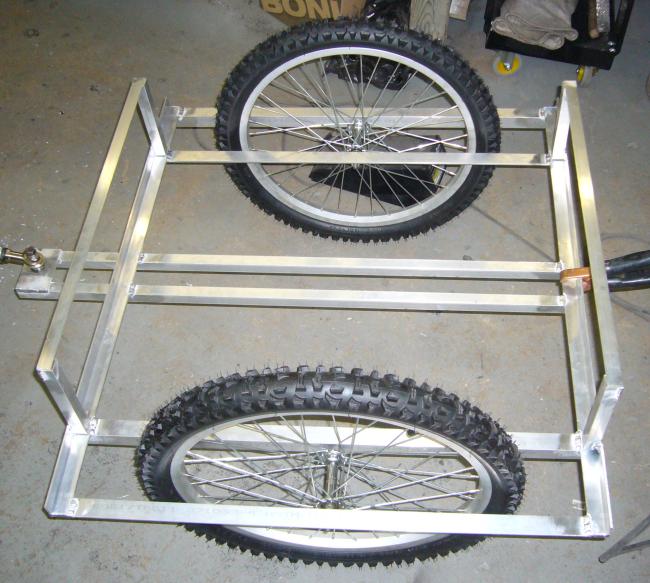
Construction of the cart started with cutting the aluminum to which the wheels would mount. The wheels fit between two lengths of aluminum angle which were cut to 28 inches.
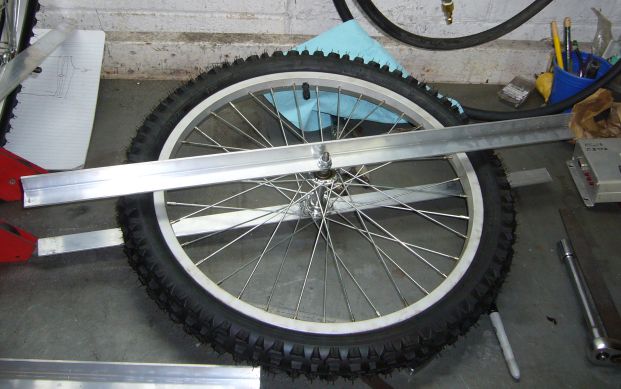
I didn't decide on this length through any special process. All I did was lay out the wheels and then figure the approximate dimensions of the cart by what looked good enough to haul a bunch of stuff. For some reason, in my head, I had roughly the size of a lawnmower deck in mind. Must have come from a childhood spent cutting lawns. The notches in the center of the wheel crossmembers were made just by using an angle grinder and a steady hand, then finished off with a file for fine tuning. There is a little play in each so that the wheels can be aligned after the cart is finish welded. Everything moves a little as it is welded.
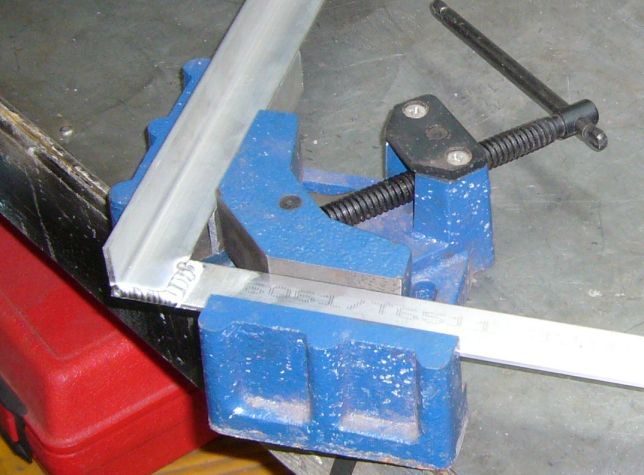
A 90 degree welding vice was used to hold the metal in position as the basic frame of the cart was assembled. It was assembled in two "L" shaped halves, each one welded fully in the vice and then allowed to totally cool as to avoid warpage. The outer side of each set of wheel cross members was used as the outer most edge of each side of the cart.
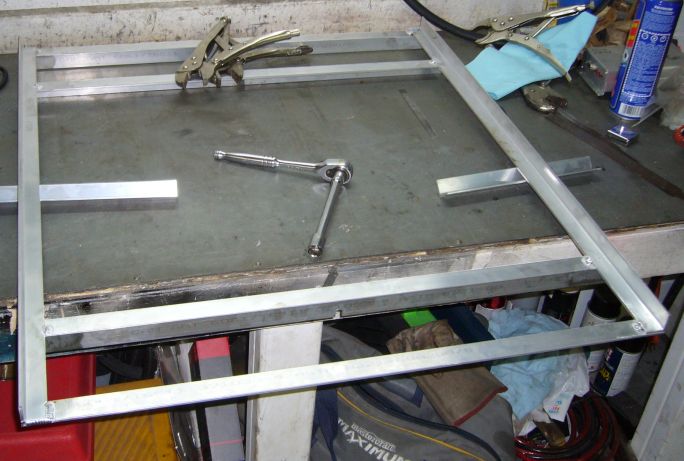
The welding vice was used again to join the two "L" shaped halves into a square frame. The total width ended up being 31.5" with about 22 inches of usable space between the wheels. I did not want the cart so wide as to be difficult to maneuver on sidewalks. It seems pedestrians don't appreciate having their ankles clipped by sharp aluminum corners. Weird, I know. The inner wheel crossmember was then welded in place and as luck would have it, they both fit, meaning that the frame was still straight! It actually is fairly challenging to weld a large square frame as even a tiny bit of movement on the weld end means a large amount of movement on the free end.
After the welds cooled the cart was relocated to the floor and the wheels reinstalled. Some method was needed to actually connect it to the bike, so I cut 2 lengths of 3/4" x 1/16" square aluminum tubing to 34 inches and welded them to a 3 1/4" x 2" quarter inch thick aluminum plate. The resulting tongue assembly was then welded into the center of the cart frame.
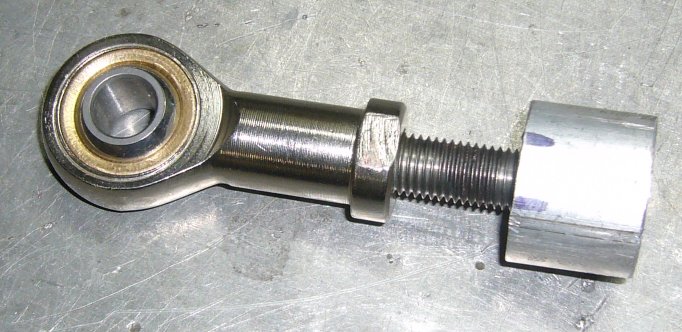
The tongue assembly also ended up stiffening the cart up quite a bit. It took some figuring to decide how to actually connect the cart to the bicycle. But after some thought, I decided to use a hymn joint on the cart end and a clevis connector on the bicycle end.
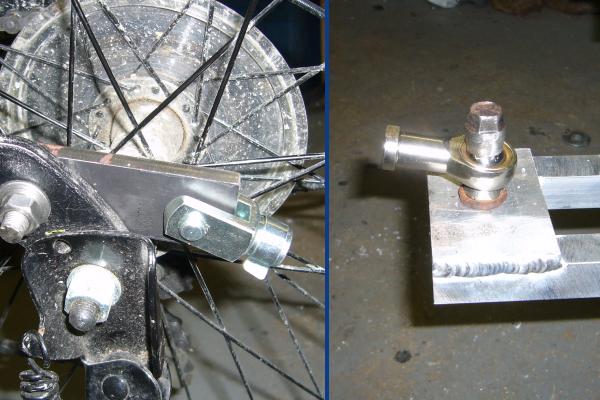
A short piece of 1/4" steel connected the clevis to the bike fork through a spare hole. Yeah, 1/4" steel is kind of beefy but I didn't want to use aluminum mainly because it is much softer and would tend to wear out with a steel clevis pin rotating inside of it. On the cart end, I made misalignment spacers for the hymn joint by grinding down some old nuts (that's what she said!), then bolted the hymn joint through the 1/4" tongue plate with a long bolt and plenty of blue Loctite. I didn't have any brand new bolts of the correct length so I just pulled an old bolt out of the hardware bucket as I was in a bit of a hurry.
To actually make the connection between the bike and cart, I created a tow bar out of a short length of 1 1/4" square aluminum tubing. Since the hymn joint and clevis end both had a female set of metric threads, I needed the tow bar to have a corresponding set of male threads.

I cut two pucks, about 1/2" long, out of some 1" solid aluminum rod. Then I drilled a hole in the middle of each and tapped for the appropriate threads. Once the bolts were threaded in and tightened down, I welded the pucks to the ends of the square tubing. Note the hole drilled in the tubing. This is to relieve pressure as the ends are welded, which will help avoid the welds picking up contaminates from inside the tube. I know these welds aren't holding up a space shuttle but it still pays to follow proper procedure.
The tow bar was chucked in the vice to secure it while the clevis and hymn ends where threaded into place. Red Loctite was used on the threads and they were turned until the both lined up (very tight).
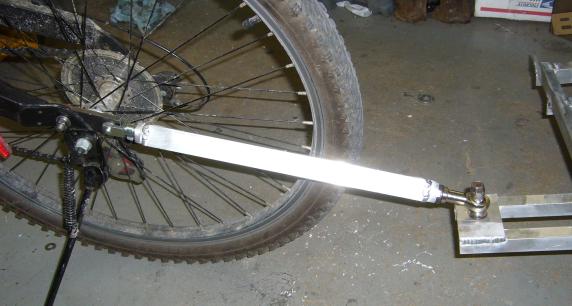
Anyone with experience in trailers can probably see the immediate problem with the tow bar installed between the bike and cart. But I'll get back to that later. Now that the bar was installed, the cart is now self supporting. While it can pivot up and down at the bike end, it cannot move side to side. All turning movement is taken up by the hymn joint.
Next, so the cart can actually hold stuff, I made a set of rails. Using about 6" of 3/4" x 1/16" aluminum tubing for uprights and then 22" of 3/4" x 1/16" angle I made one set for the front and one set for the back.
The front and rear rails were welded in the welding vice to assure perfect 90 degree angles, then were welded to the front and rear of the cart on the vertical wall of the aluminum angle.
The last step in the construction of the car was to finish the rails. Two outer rails were cut from 28" of the same 3/4" x 1/16" aluminum angle, then welded on top of the existing rail corners. I could have cut all the rails at 45 degree angles for a cleaner joint but didn't really think that was necessary for something so utilitarian and I had specifically avoided 45 degree mitered joints everywhere else in the cart just for ease of fabrication. The increase in stiffness across the frame by the addition of the top rails was quite impressive. It went from a wobbly assemblage of aluminum to something that felt solid.
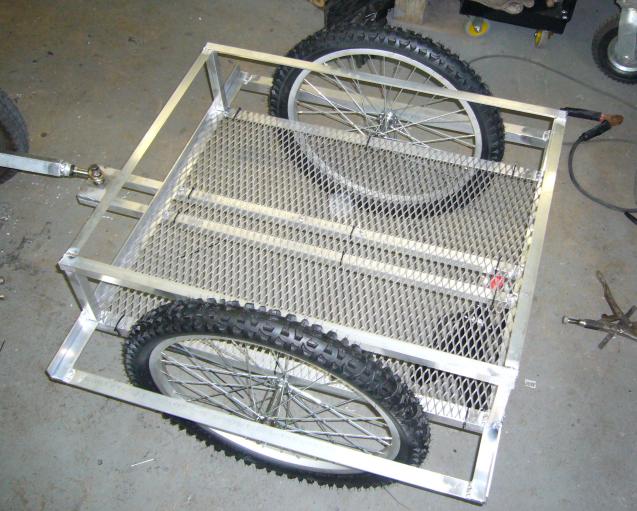
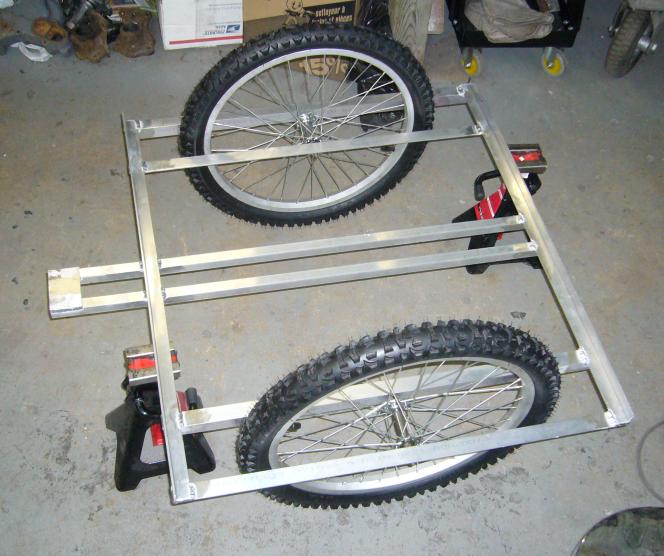
Finally, the cart was completed by the installation of an aluminum mesh floor. At first I tried to weld the floor in place, and while I could do it, the process was a raging pain in the ass as I had to fight blowing the mesh away while trying to maintain a puddle on the cart frame. Plus, the mesh was made of some low and unknown grade of aluminum as compared to the 6061 of the cart. I considered screwing it in place but didn't have enough small self-tapping screws and large washers around the shop, so I went to the next best thing; 50 LBs zip ties. Since the weight of the items in the cart will keep the mesh securely against the frame, all that I really needed was some simple way of keeping it from gradually shifting around. The zip ties did the job and took only a minute to install.
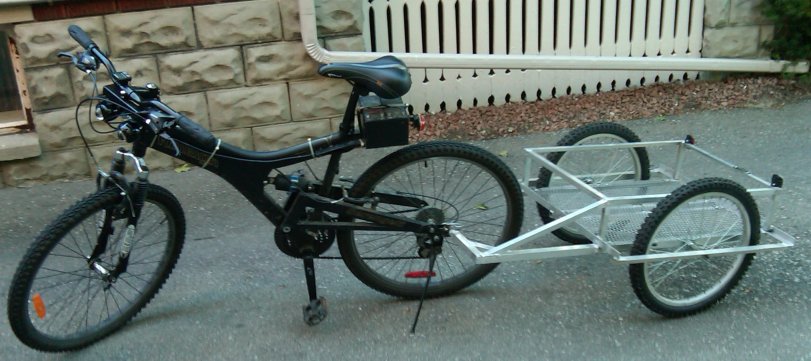
The first journey with the cart was the 4KM ride home from my shop, as it wouldn't fit in any of my cars. While the empty cart was quite bouncy, it seemed to handle well. A few days later I gave it a real test by loading it with about 50 LBs of bricks and riding around the block. It rolled quite easily and seemed easy to pull. However, now we get to the problem I alluded to earlier. That problem, as well known to those who pull any kind of trailer, is death wobble. Because there are two pivot points on the tow bar, the cart is able to oscillate back and forth. This can, at times, set up an ever increasing wobble that must be quickly compensated for by the rider. Sounds nasty but after a few minutes of practice it can be anticipated so the wobble is only a small concern.
A few weeks after the cart was built, on a Saturday afternoon threatened with eminent rain, the cart was packed with gear and the ride began. After meeting with the other two riders, we headed out of the city and towards our destination. Aside from a quick 10 minute freezing cold rain shower and a wicked head wind, the tip was uneventful and quite enjoyable. However, I had severely underestimated the effort required to tow a cart. A few trips around the block loaded with bricks is one thing, 45 KM into head winds and up hills is another kettle of fish entirely. If I had to guess I would say that it increased the effort needed to pedal the bike by about 5 fold. As a practical example, as the others could glide effortlessly down hills while gaining speed, I had to pedal simply to maintain my existing speed on those same downhills. Regardless, we made it to our destination in good time (approximately 5 hours with plenty of stopping and fooling around) and the effort was worth it when we popped the champaign cork at the edge of a cliff looking over Lake Erie! The return trip was far more pleasant as the headwind was now a tail wind. And of course the cart was quite a bit lighter as the food had been consumed and the ice left in the woods to melt.
 Another issue created by the double hinged tow bar was that the cart would tend to either nose up or down, depending mostly on momentum and pulling force. I'm sure this wasted a lot of energy and made riding it with a bit harder than necessary. It was obvious that while the fundamentals of the cart were fine, that tow bar needed to be fixed. Early spring the year after, I modified the tow bar to a more standard single pivot design as well as modifying the hitch mount on the bike itself to accept the new bar and keep it well away from the wheels. You can see in the drawing that my new bar basically copies every other bike cart out there.
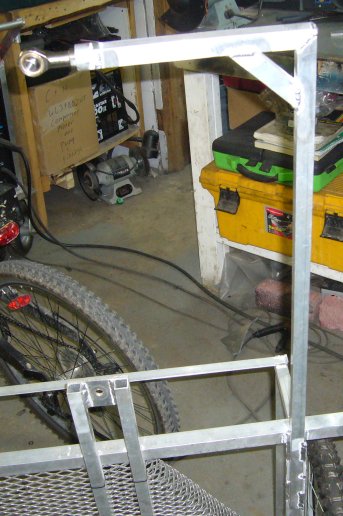
The first step was a better hitch on the bike. As you can see in the image below, it is made from some fairly beefy 1/4" steel plate. While aluminium would have made significant weight savings, it would have eventually work hardened and probably cracked apart at the worst possible time. Building it out of aluminium would have also meant that I would have had to bolt the hitch pin in place instead of welding. That hitch pin is simply a longish 5/16" bolt from the hardware store inserted through a hole drilled in the mount then welded in place. I cut the threads off the bolt then carefully drilled a hole near the top of the cotter pin. I then spun a nut against the grinding wheel using the drill to turn it into a cone shaped misalignment spacer. Once slipped over the bolt, it was tack welded to the base of the mount. Additionally another nut was turned cone-shaped and a washer tacked to the wide end.
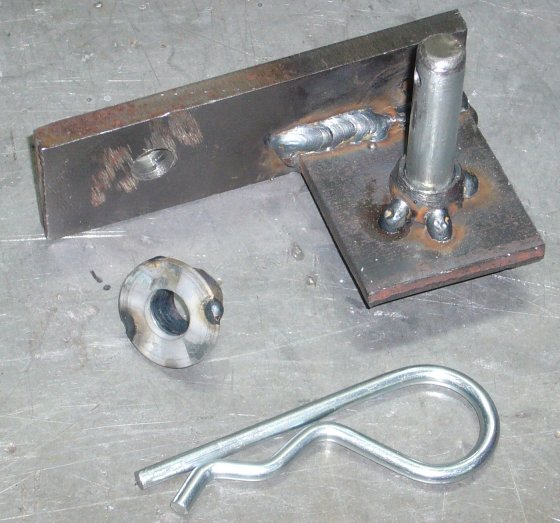
The hitch is used by first sliding the cart tongue over the bolt, then the washer/nut assembly is placed on top, after which the cotter pin is inserted. Incidentally it rattled quite a bit so I ended up using two rubber toilet tank washers as bushings between the top and bottom misalignment spacers.
Recreating the tow bar was next and it started with cutting some 3/4" 1/16" wall aluminium tubing to length. Using the welding vice, it was welded in an L shape with a gusset placed at the joint for extra strength.
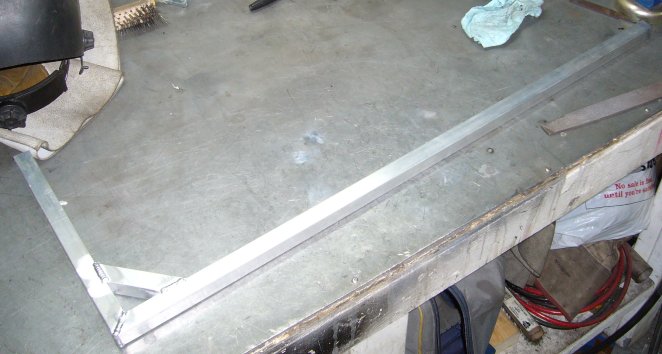
Note that the joint was made with each tube cut at a 45 degree angle. This maximizes the weld surface between the tubes. If cut at 90 degrees, one of the tubes would end up being welded only to one side of the other which creates a much weaker joint.
Another bung was cut, drilled and tapped. Then a stud was screwed into it and another hymn joint installed. It was welded onto the tow bar, and then the bar was welded to the inside angle just in front of the wheel mount.
The bike side of the hitch received a coat of black paint so it matched the bike and wouldn't turn into a rusty eyesore.
With everything hitched up, the resulting improvement was dramatic. No more rubbing on the tire and there was a confidence at any speed. As I had thought, eliminating the double pivot completely removed the death wobble. It was rather amazing how much energy that wobble took up because I'd have to say that it honestly feels like nothing is behind the bike now until the cart is heavily loaded.
However, as you may notice from the picture, another gusset was added to support the tow bar vertically. During testing the cart was loaded with about 80 LBs of bricks and a massive amount of flex was noticed. Adding the bar really solidified the structure up and prevented tow arm failure due to work hardening. Which of course would have happened at the worst possible time. Having the cart pass the bike on a sweeping turn at the bottom of a hill would not be a pleasant experience!
Overall with the improvements I am completely happy with the design of this cart. I have probably over 1000KM of towing on it at this point including (as of this writing) 3 more trips to Port Stanley. That ride has become a yearly tradition in the late summer and is always an adventure.
Back To Projects Page | Mail
Me | Search