| himadri |
40W Fluorescent Lamp Inverter |
Tuesday, March 19, 2013 11:16:29 AM |
| i also make this inverter.its give me 100-120vac 3amp and i use 2n3055 trangistor ,16v 100uF capacitor but voltage(120vac) stay 1 sceond. pleace help me sir, mail me. |
| Mr Denton |
40W Fluorescent Lamp Inverter |
Tuesday, October 02, 2012 3:44:00 AM |
| Low efficiency isn't really the issue with this circuit. Radiated Electromagentic waves are. This ferrite rod idea is insane. It will destroy radio reception for miles. |
| Elavarasan |
40W Fluorescent Lamp Inverter |
Tuesday, March 16, 2010 7:50:00 AM |
| hi your circuit was poor efficient so to realize and give proper circuit with full details |
| anonymous |
40W Fluorescent Lamp Inverter |
Monday, November 09, 2009 5:26:13 AM |
| This circuit isn't efficient enough. Much power loss occur. Use two tansistor instead and use an efficient transformer instead of winding the wire around antenna rod. |
| anonymous |
40W Fluorescent Lamp Inverter |
Wednesday, September 16, 2009 6:20:32 PM |
| This circuit does what it says, and does it pretty well. If you want to post smart comments that you can do better, include a link to your site :-)
I'm just building my third one.
Thanks |
| anonymous |
40W Fluorescent Lamp Inverter |
Friday, June 12, 2009 6:14:15 PM |
| If U want to Get a better running circuit and cooler transistor temperatures not to mention MUCH lower current draw of 1.2A verses 3.6A with the transistor shown,,,,, then E-mail me and I'll send U an E-mail with an attachment J-peg Picture of the schematic that I re-enginered using this very Quaint Circuit.
Some things were added to Vastly IMPROVE stability and lower current draw PLUS ad longevity to the Operation of this inverter!!!!!!!
Ya gotta Break some eggs, If ya wanna get to the Yolk, Folks---- He--He..... |
| Björn Felten |
40W Fluorescent Lamp Inverter |
Tuesday, May 05, 2009 7:50:13 AM |
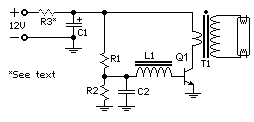
| C3 is C2 and C2 should be removed from the parts list.
Check out the original at http://www.talkingelectronics.com/projects/FluorescentInverter/FluorescentInverter.html |
| jon |
40W Fluorescent Lamp Inverter transformer 'ringing' |
Thursday, April 02, 2009 6:54:23 AM |
| When I built this curcuit I connected the transistor to an oscilloscope and the transformer 'ringed' at over 100v! Is there a way to filter this |
| anonymous |
40W Fluorescent Lamp Inverter |
Wednesday, March 11, 2009 5:49:07 AM |
| guys, C3 goes parallel with the lamp. and yes, Q1 does get hot. this is a simple oscillator and not a specialized circuit to drive lamps. it is simple and easy to build, but if you want something efficient, you'll need a better schematic, maybe with specialized IC. |
| anonymous |
40W Fluorescent Lamp Inverter |
Sunday, March 01, 2009 2:39:06 PM |
| Hi
I'm quite blind in electronic but I tried build this inverter, because I love challenge my abilities every time do not laugh but there are some ground signals 4 in total which comes from C1, R2, C2 and Q1 What I should with?, and the schematic shows T1 secondary connecting in just one polarity of the lamp, doesn't matter there are 2 each side. Thanks for share with us your acknowledgment.
Regards
Matthew |


